Best Electric Bikes for Seniors UK 2026: Lightweight Step-Through Models
Best Electric Bikes for Seniors UK 2026: Lightweight Step-Through Models Buyer’s Guides • Senior Riders • Step-Through E-Bikes Best Electric Bikes for Seniors UK 2026:
At the heart of every lithium-ion pack sits a Battery Management System (BMS). This internal circuit board continuously monitors cell voltages, temperature, and current draw. If it detects anything outside safe parameters — extreme cold, a sudden voltage sag under load, or a significant imbalance between cell groups — it cuts the output entirely as a protective measure.
Beyond the BMS, the power delivery chain includes physical connectors, an internal fuse, the motor controller, and the handlebar display. A fault at any single point can leave the electric bike not turning on. Because the display only reports charge level rather than actual voltage under load, these failures are easy to misread as a dead battery when the real culprit may be something far simpler to fix.
Stop immediately and seek professional help if you notice any of the following:
Reseating the battery is the simplest fix and should always be the first physical step. Remove the battery completely, wait thirty seconds, then firmly slide it back into the mount until you hear or feel a definite click.
While the battery is out, inspect the metal terminals on both the pack and the frame cradle for green or white oxidation, dirt, or moisture. Clean with a dry cloth or a small amount of isopropyl alcohol on a cotton bud, then allow to dry fully before reseating.
The BMS shuts down output when it detects:
In many cases, simply connecting the battery to its charger for fifteen to twenty minutes supplies enough low-level current to wake the BMS from its sleep state.
Locate the fuse holder — typically found beneath a small rubber or plastic cap near the charging port or on the side of the battery casing. Remove the fuse and hold it up to a light source. A broken internal filament confirms it has blown.
Plug the charger directly into a wall socket on a different circuit, bypassing any extension leads or surge-protected power strips. If the charger LED fails to illuminate at all, the charger itself is the likely fault.
Use a torch to examine the battery’s charging socket. Look for bent pins, debris, corrosion, or moisture. Clean the port with a short burst of compressed air. Never insert metal objects into the socket.
If the battery has been stored for several months or was fully discharged to zero, leave it connected to the charger for at least twenty to thirty minutes. The trickle current is often sufficient to wake the system.
Lithium-ion chemistry will not accept a charge outside approximately 0°C to 45°C. If the pack has been stored in a cold garage or left in direct sunlight, bring it indoors and allow it to reach room temperature first.
If your battery is removable, disconnect it from the frame and charge it independently. If it charges successfully off the bike but not when mounted, the fault lies in the frame’s internal wiring or cradle connectors — not the battery itself.
A healthy 48V charger should read approximately 54.6V at the output pins when unloaded. A 36V charger should read ~42V; a 52V charger ~58.8V. A reading significantly below this confirms the charger is faulty.
Set the device to DC Voltage mode at a range above the battery’s nominal voltage. Touch the red probe to the positive terminal and the black probe to the negative terminal on the discharge connector.
| Battery (Nominal) | Expected Fully Charged Reading | Interpretation |
|---|---|---|
| 36V | 41.5V to 42V | Healthy and fully charged |
| 48V | 54.0V to 54.6V | Healthy and fully charged |
| 52V | 58.0V to 58.8V | Healthy and fully charged |
| Any | 0V or far below expected | BMS lockout or blown fuse |
| Any | Within range, bike unresponsive | Controller or display fault |
Disconnect the battery from the frame entirely. If the pack has a dedicated power button, hold it down for ten seconds.
Reconnect the charger and leave it plugged in for fifteen minutes. This low-level input current frequently wakes a BMS from a protective sleep state.
If that approach fails, leave the battery fully disconnected from both the bike and the charger for thirty minutes. This can clear temporary fault flags stored in the BMS memory.
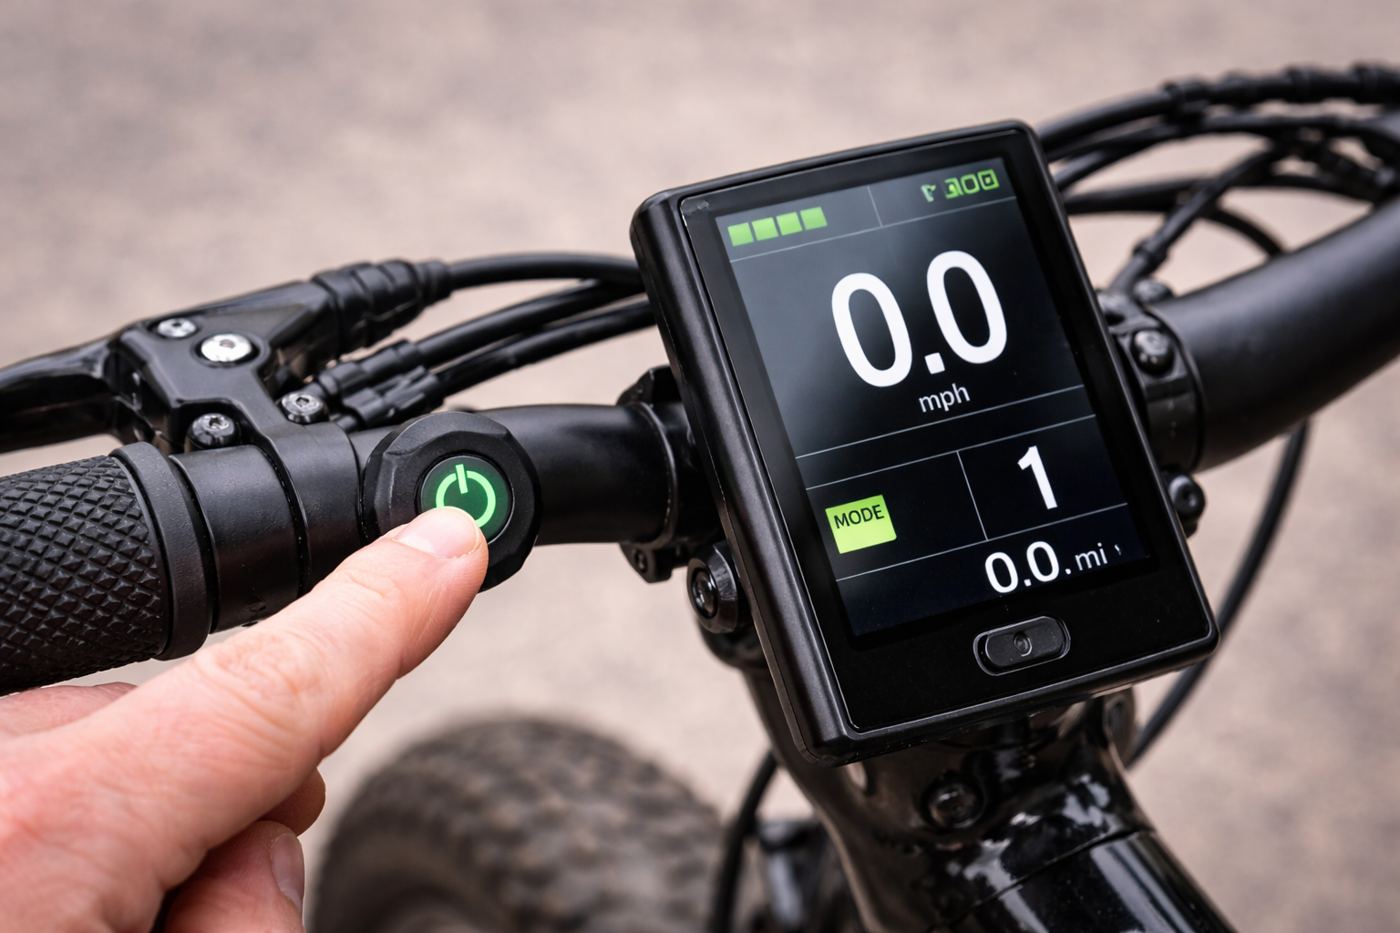
Start with the display. Check that the power button is not sticking due to dirt or moisture ingress — some systems require a press of five to ten seconds to initiate the startup sequence. Trace the display cable to the first connector junction, paying particular attention to the point where it enters the handlebar stem.
If the display powers on but the motor does not engage, the controller is the more likely fault. Perform a basic reset: power down the bike, disconnect the battery, and wait thirty seconds for the internal capacitors to discharge before reconnecting.
| Symptom | Likely Fault | Diagnostic Action |
|---|---|---|
| Display does not power on | Display unit, cable, or power button | Check button for sticking; trace cable to first connector junction |
| Display powers on, motor does not engage | Motor controller | Controller reset; inspect housing for water damage or burning smell |
| Display and motor both unresponsive | Battery output or main wiring harness | Test battery voltage with multimeter; check main connector plugs |
Most quality packs are rated for 500 to 1,000 full charge cycles before capacity begins to degrade noticeably — typically two to five years depending on riding frequency and charging habits.
| Indicator | Detail |
|---|---|
| Severe range loss | Range declined to less than half the original figure and does not improve after a full charge cycle |
| Poor charge retention | Battery fails to hold charge for more than a few hours after being unplugged |
| Consistent power cutouts | Cutouts occur consistently under moderate load despite clean connections and a healthy controller |
| Physical damage | Casing is visibly swollen, cracked, or shows signs of leakage |
| Repeated fuse failure | A replacement fuse blows immediately after installation, indicating an internal short circuit |
All4eBikes stocks replacement lithium-ion batteries in 36V, 48V, 52V, and 72V configurations, with guidance on matching the right pack to your specific conversion kit or factory e-bike.
Not sure whether your battery needs repair or replacement? Message us on WhatsApp with a description of the fault and we’ll give you an honest assessment before you spend anything.
Best Electric Bikes for Seniors UK 2026: Lightweight Step-Through Models Buyer’s Guides • Senior Riders • Step-Through E-Bikes Best Electric Bikes for Seniors UK 2026:
How Much Does It Cost to Charge an E-Bike? UK Guide 2026 Running Costs • Batteries • E-Bike Guides How Much Does It Cost to

Your ebike professionals!
2 Beresford Road Lane
Cardiff
UK
CF24 1QU
Welcome to ALL4EBIKES!
Typically replies within minutes
WhatsApp Us
🟢 Online | Privacy policy
WhatsApp us