City E-Bike Guide (Europe): How to Choose, Configure & Set Up the Perfect Commuter E-Bike
Guides • City / Commuter E-Bikes • Europe
City E-Bike Guide: How to Choose & Configure the Perfect Commuter Setup (Motor, Battery, Comfort, Safety)
Updated: • Reading time: ~20–30 min
City commuting 250W Europe Battery & range Mid-drive vs hub Anti-theft setup
Safety note:
Always follow your local rules, wear a helmet, use quality brakes/lights, and do a slow test ride after any configuration change.
1) Define your city use-case (this determines everything)
City e-bikes succeed when the setup matches your real commute. Before you choose a motor or battery, write down: distance, hills, cargo, parking/theft risk, and weather.
Fast commuter checklist
Distance: 5–10 km each way, 10–25 km, or 25+ km?
Elevation: flat, rolling, or steep city hills?
Start/stop: many traffic lights or longer steady stretches?
Cargo: laptop + clothes, groceries, or child seat?
Storage: indoor safe parking or street locking?
Your “non-negotiables” (choose 3)
Low maintenance: belt drive + internal gears + full chain guard.
Less sporty handling when heavily loaded (choose a stiff frame)
Hybrid / trekking
Mixed city + longer rides
Efficient position, stable, often better gearing
Can feel more “forward” and less relaxed
Folding
Train + bike combos, apartment storage
Portable, easy storage
Smaller wheels feel harsher on potholes; check brake quality
Cargo / longtail
Kids, groceries, heavy loads
Car replacement potential
Needs strong brakes + big battery; storage is harder
Rule of thumb: If you carry stuff more than twice a week, choose a bike designed for racks/cargo,
not a “sport bike” with a rack bolted on later.
3) Motor choice: mid-drive vs rear hub for city riding
For city e-bikes, both mid-drives and rear hub motors can be excellent. The “best” motor is the one that matches: your hills, how much maintenance you want, and how smooth you want the assist.
Feature
Mid-drive
Rear hub
Hills
Excellent: uses gears to stay efficient
Good: strong on moderate hills; steep hills can stress small hubs
Stop/start feel
Very natural “bike-like” assistance
Often smooth and quiet; can feel like a gentle push from behind
Maintenance
More drivetrain wear (chain/cassette)
Less drivetrain wear (motor bypasses chain)
Wheel service
Normal wheels, easy tire changes
Rear wheel is heavier; flats can be more annoying
Best for
Hilly cities, riders who want “premium” pedal feel
Value builds, flat/rolling commutes, low drivetrain wear priorities
When to choose a mid-drive (city edition)
You have steep hills and want consistent climbing without overheating.
You want a natural pedal feel and efficient range.
You’re okay replacing chains/cassettes a bit more often.
Compatibility alert: Before buying a conversion kit, confirm:
bottom bracket type/width (mid-drive) OR axle/dropout type/spacing (hub motor),
plus brake rotor and cassette/freewheel compatibility.
4) Power & torque for city: what matters more than “watts”
In city riding, the feel you notice most is torque at low speed (pulling away from lights)
and smoothness (not jerky on crowded streets).
City scenario
What to prioritize
Why it matters
Many stops
Quick but smooth ramp-up
Feels safer and more predictable in traffic
Hills + headwind
Torque + gearing
Prevents “bogging down” and saves battery
Wet weather
Traction-friendly tuning
Abrupt power can spin the rear tire on paint/metal covers
Heavy cargo
Strong brakes + battery Wh
Control and range become the limiting factors
Practical city power guidance
Flat city + light rider: modest assist feels great and extends range.
Rolling/hilly city: prioritize a motor setup that stays efficient on climbs (mid-drive often shines).
Don’t chase peak numbers: smooth delivery + good brakes = faster real commuting.
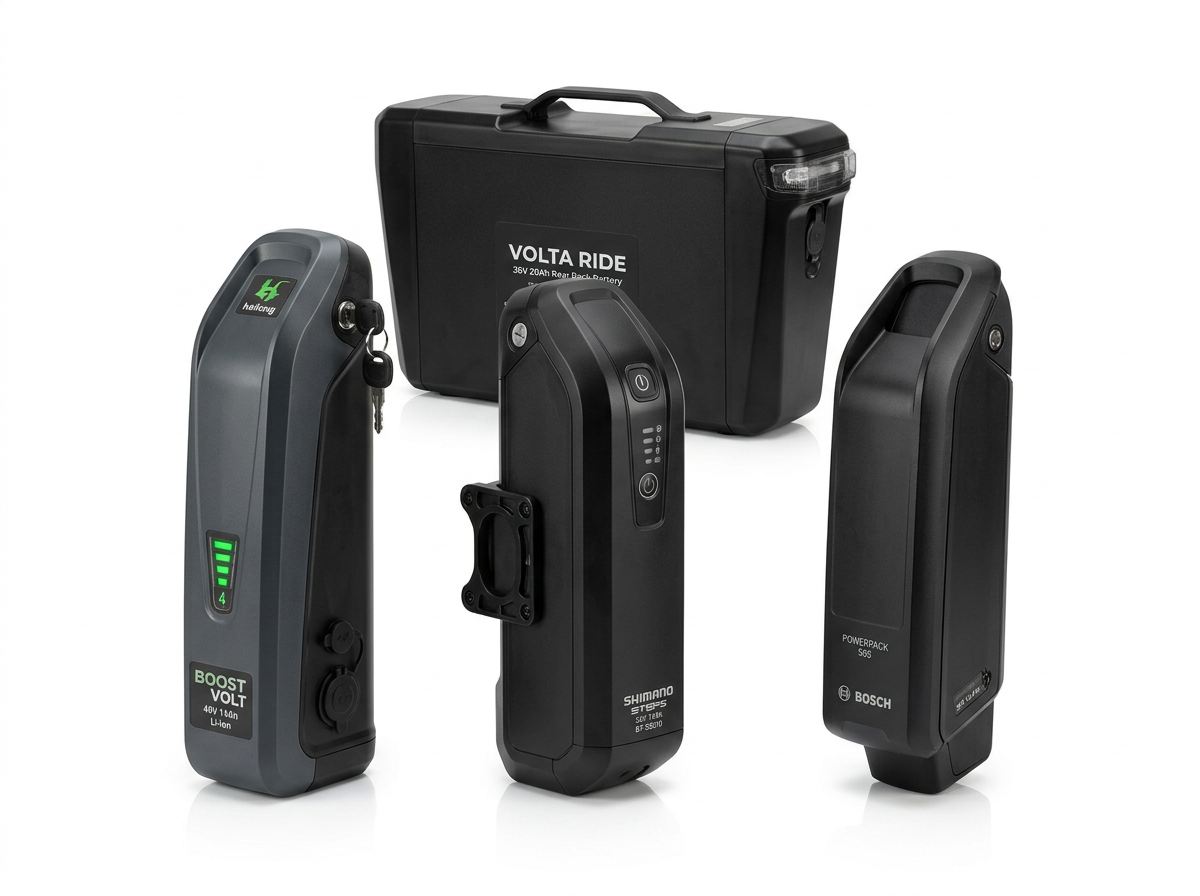
5) Battery guide: 36V vs 48V, Wh, range, and charging habits
Batteries are best compared by watt-hours (Wh), not just “Ah”.
Use this simple formula: Wh = Voltage (V) × Capacity (Ah).
500–750 Wh: most commuters (good range + still manageable weight)
750–1000+ Wh: long commutes, hills, cargo, cold weather
City range depends on start/stop traffic, wind, tire pressure, and how much you contribute with pedaling.
Simple range estimate (realistic)
Use a conservative consumption number:
Easy city: ~7–10 Wh/km
Mixed city: ~10–15 Wh/km
Hilly/cargo/cold: ~15–25 Wh/km
Example: 600Wh battery ÷ 12Wh/km ≈ 50 km typical range.
36V vs 48V (how to decide)
36V: common for city bikes; smooth, efficient, often lighter systems.
48V: can feel stronger under load at the same current limit; useful for hills/cargo if your motor/controller supports it.
The real rule: match voltage to your motor/controller and choose a battery with enough discharge capability for your setup.
Battery safety: Use a reputable pack with a proper BMS, quality connectors, and a fuse near the battery.
Avoid charging unattended and keep charging away from flammables.
6) Drivetrain choices: chain vs belt, derailleur vs internal gears
Option
Best for
Pros
Cons
Chain + derailleur
Value, sporty feel, wide gearing
Efficient, cheap to repair
More cleaning; wears faster with mid-drive power
Chain + internal gear hub
All-weather commuting
Low maintenance, shifts well in stop/start
Heavier; typically higher cost
Belt + internal gears
“Just ride” commuters
Very clean, quiet, long-lasting
Needs compatible frame; higher upfront cost
City reliability tip: If you ride in rain or winter road grime, the “clean drivetrain” options
(internal gears / belt) can feel like a massive upgrade.
Inspect cable routing/connector security (especially on conversions).
Seasonally
Brake service (bleed hydraulics if needed).
Replace worn tires for wet season grip.
Check wheel trueness and spoke tension (hub builds especially).
FAQ
Mid-drive or rear hub for city commuting?
Choose mid-drive if you have steep hills and want the most natural pedaling feel.
Choose rear hub if your city is mostly flat/rolling and you want simplicity and lower drivetrain wear.
How big should my battery be for city riding?
Most commuters are happy with 500–750Wh. If you ride long distances, carry cargo, or ride in cold weather,
consider 750Wh+. Use Wh = V × Ah and estimate your Wh/km based on your terrain.
What matters most for comfort?
Tire width + pressure, ergonomic grips, correct saddle choice, and handlebar position usually make the biggest difference.
Add a suspension seatpost if your streets are rough.
What are the best anti-theft upgrades?
A strong U-lock plus a second lock, secure parking habits, removing the battery/display when possible, and using security bolts for
saddle/handlebar parts are the top “real-world” improvements.
Do I need brake cutoffs on a conversion?
Strongly recommended—especially if you have a throttle or you ride in busy traffic. They add safety and reduce accidental power delivery.
Local Services • Cardiff • Bike Repair & E-Bike Specialists Bike Repair Cardiff: Professional Bicycle & E-Bike Repairs, Servicing & Conversion Kit Installation Updated: April
Your trusted destination for electric bikes, parts, and accessories. Whether you’re upgrading your ride or just getting started, we’re here to help you get the most out of your e-bike experience.
Explore our range, ask us anything, and let’s power your journey together!